The Roast Chicken is a simple, nourishing, inexpensive, staple recipe that everyone should be able to prepare. There are a hundred ways to make it but this is my favorite.
This post was updated on 2/19/2019 with additional photos and improved cooking time and temp.
If you ask any accomplished home or professional cook, there’s a good chance they’ll tell you Thomas Keller owns the perfect roast chicken. It’s properly trussed with salt and pepper and that’s about it. Jaques, Martha, Gordon, Kenji, Alton, Julia; they all have their variations on the perfectly roasted chicken. Some are slight variations from Keller’s and some are a little more complex. I suggest you give them all a try and see which you like the best. I hope you’ll give the Eat Up! Kitchen Split Roast Chicken a try as well!

Like Keller, I believe in simplicity. If you’re able to get a farm fresh chicken from a local purveyor, you don’t need much more than salt and pepper to flavor your naturally delicious bird. Then again… who doesn’t love some gravy on their chicken?! Stuffing lemons in the cavity or herbed butter under the skin seems like a good idea but really, is it worth the effort? You’ve got all these juices left in the pan loaded with flavor just begging to be made into a gravy!
I’m taking the path less traveled when it comes to trussing this chicken. And by the path less traveled I mean I’m forging my own path. Spatchcocking is the process of removing the backbone then ‘opening’ and flattening the chicken. This gives you more surface area for faster roasting times and more even cooking. I think it’s great but… why aren’t we just cutting the chicken in half to start with? Right from the oven you’ve got a perfect serving for two!
February 2019 update
This recipe for Split Roast Chicken is one of my all-time favorite ‘bang-for-the-buck’ meals. I’ve updated this post after making it a dozen or so times over a couple of months. The main thing I hope you get from this is that you can cut a chicken in half and roast it easier than roasting it whole. The vegetables, gravy, and any herbs or spices you want to use are up to you.
• For best results, remove your chicken from the fridge and allow it to rest for 30 minutes wrapped in paper towels. A room temp bird will cook more evenly than a cold bird. Drawing out moisture will encourage crispy skin.
• Experiment with cooking times. High heat will cook faster but may result in tougher meat. Low and slow renders a more juicy chicken because the connective tissues have more time to cook. Something cooked with high heat will continue to increase 10 degrees in temperature after it’s removed from the oven. If it’s cooked at a low temp the carry-over heat will be less significant.
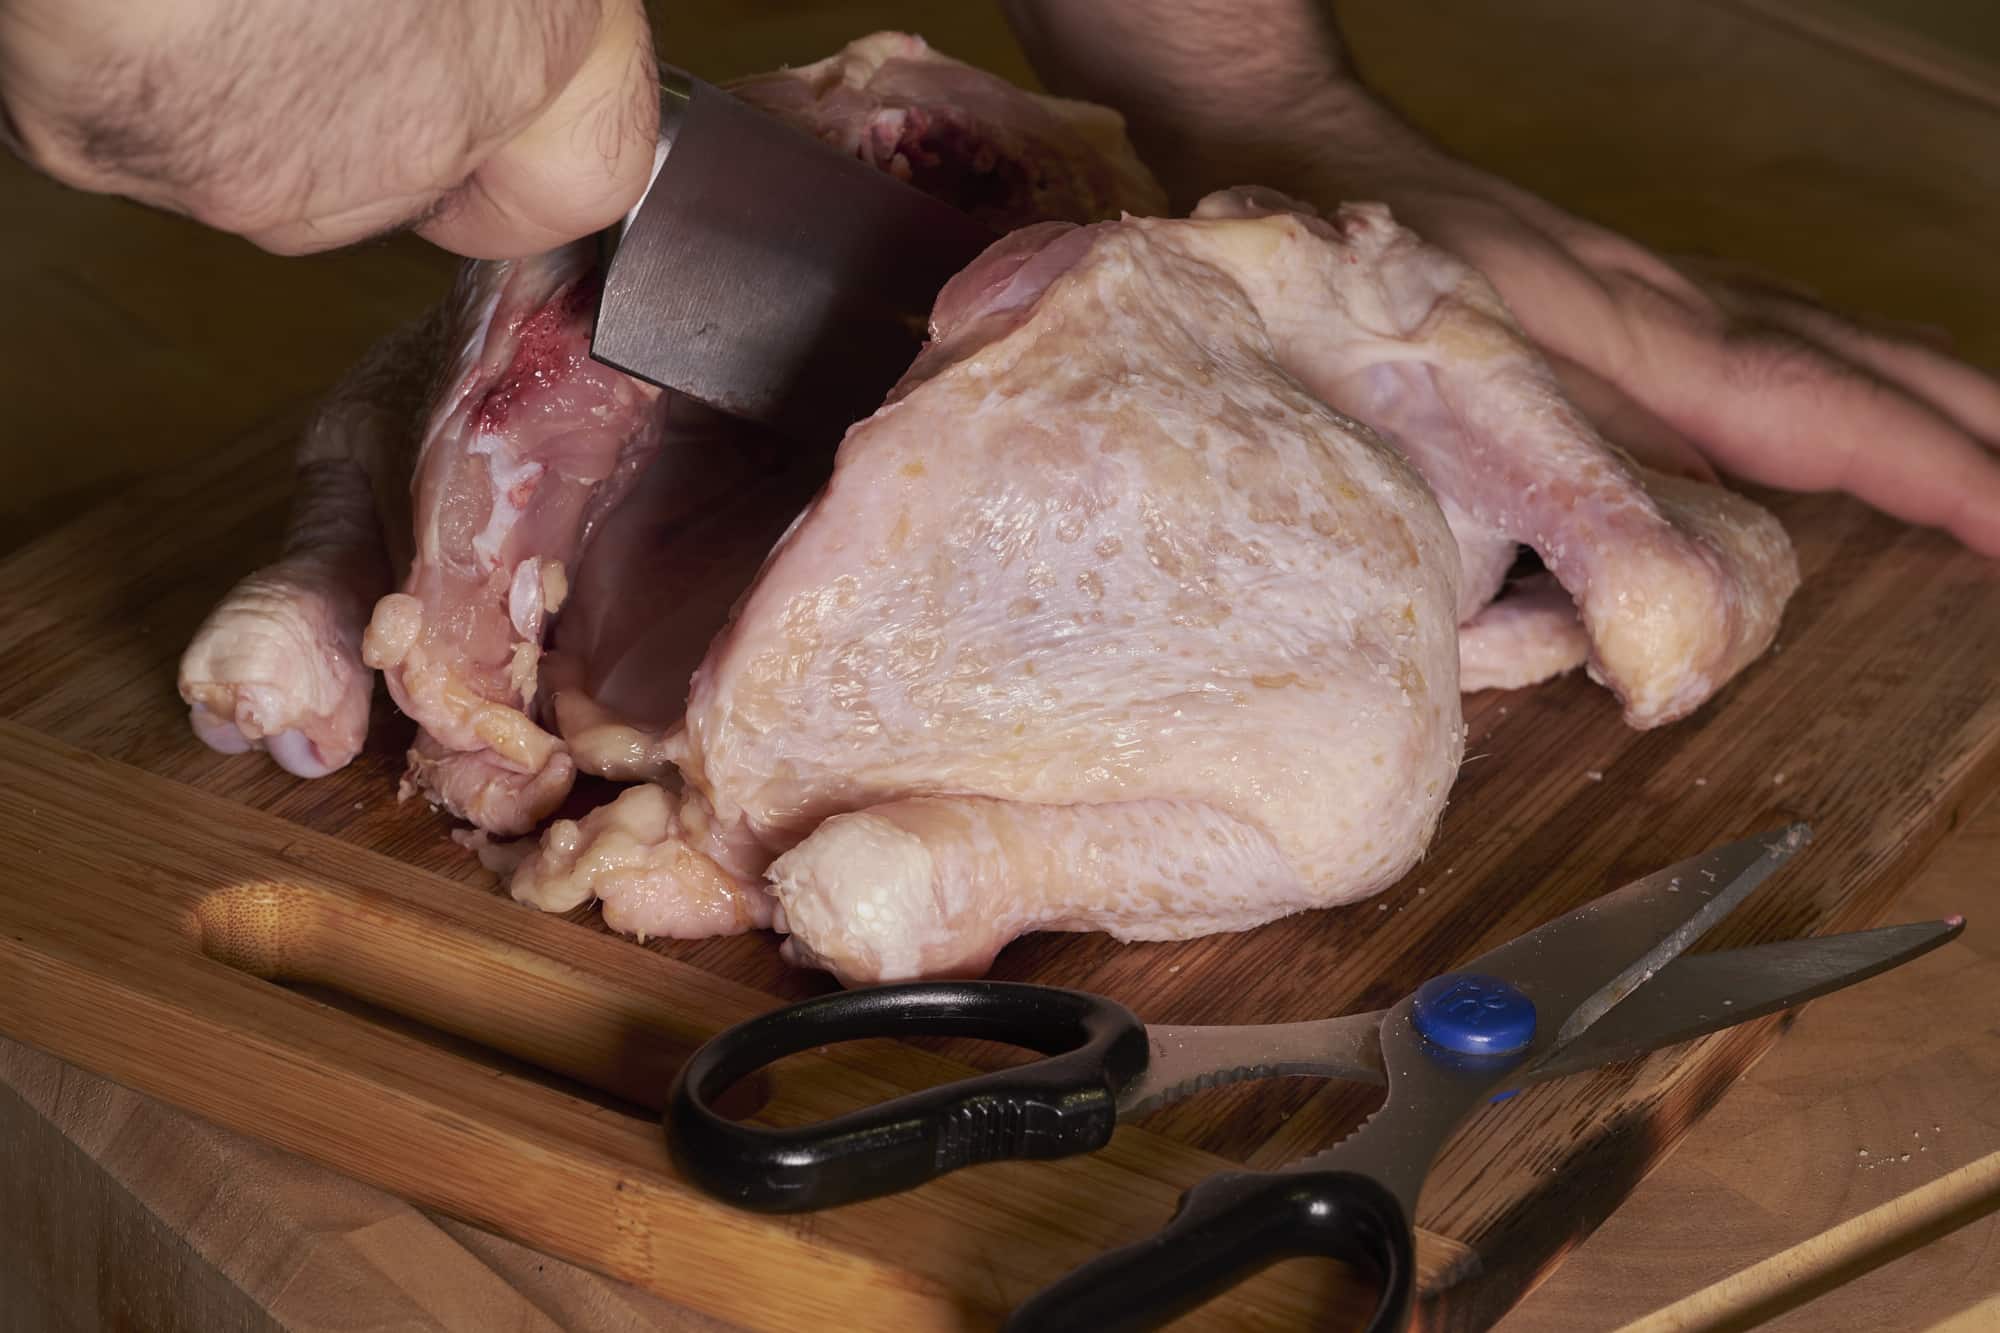
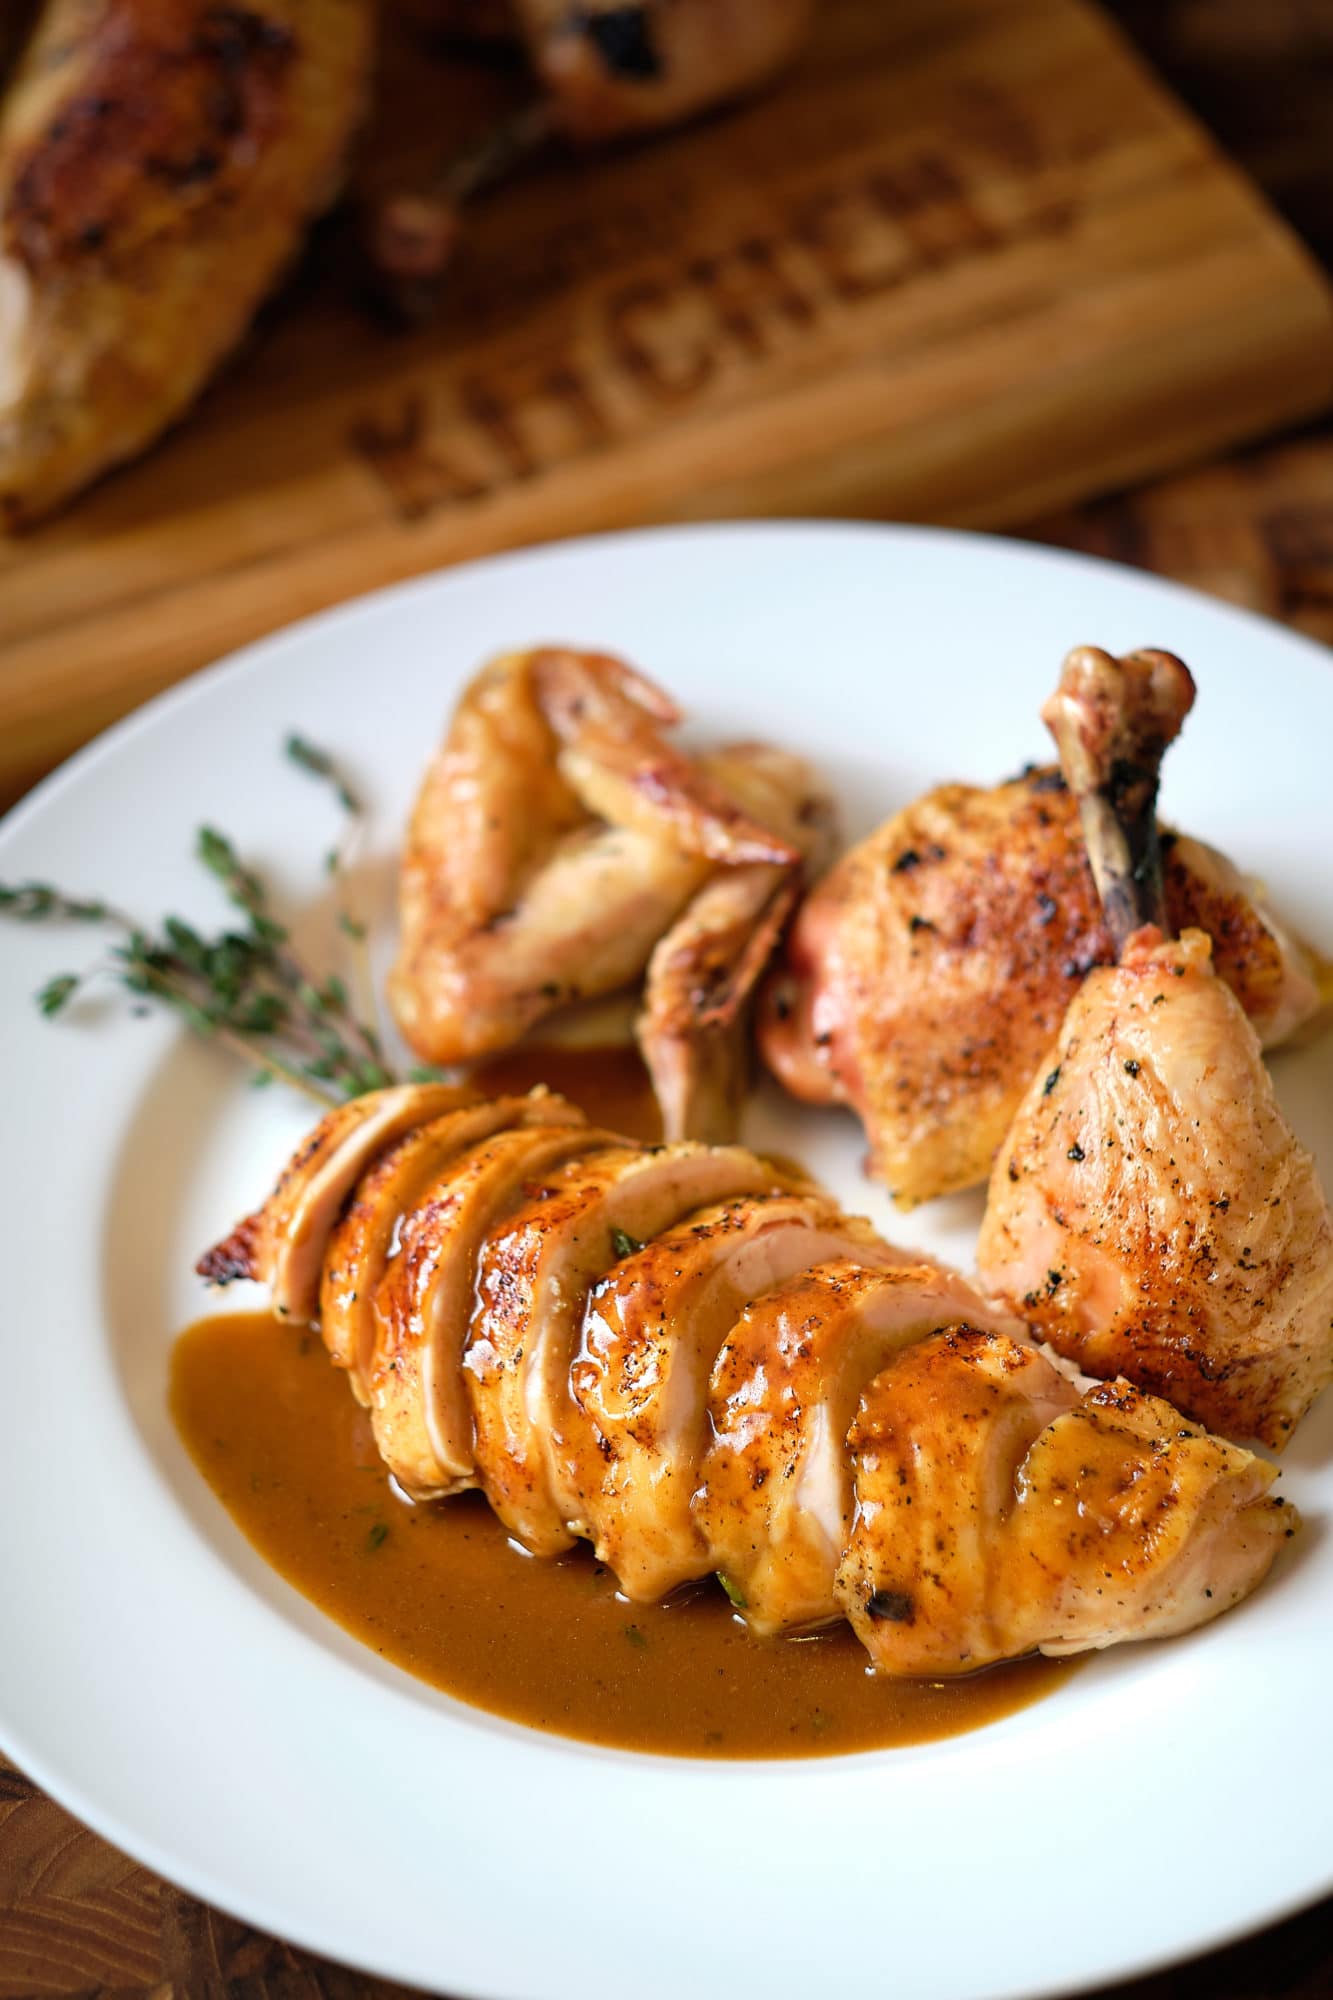
To split the chicken in half, remove the backbone with scissors then take a chef’s knife and cut right down the center of the breast bone from the inside out. Because the carcass is now flat instead of standing up vertically, its easier to coat with salt and pepper and to baste with juice when the time comes.
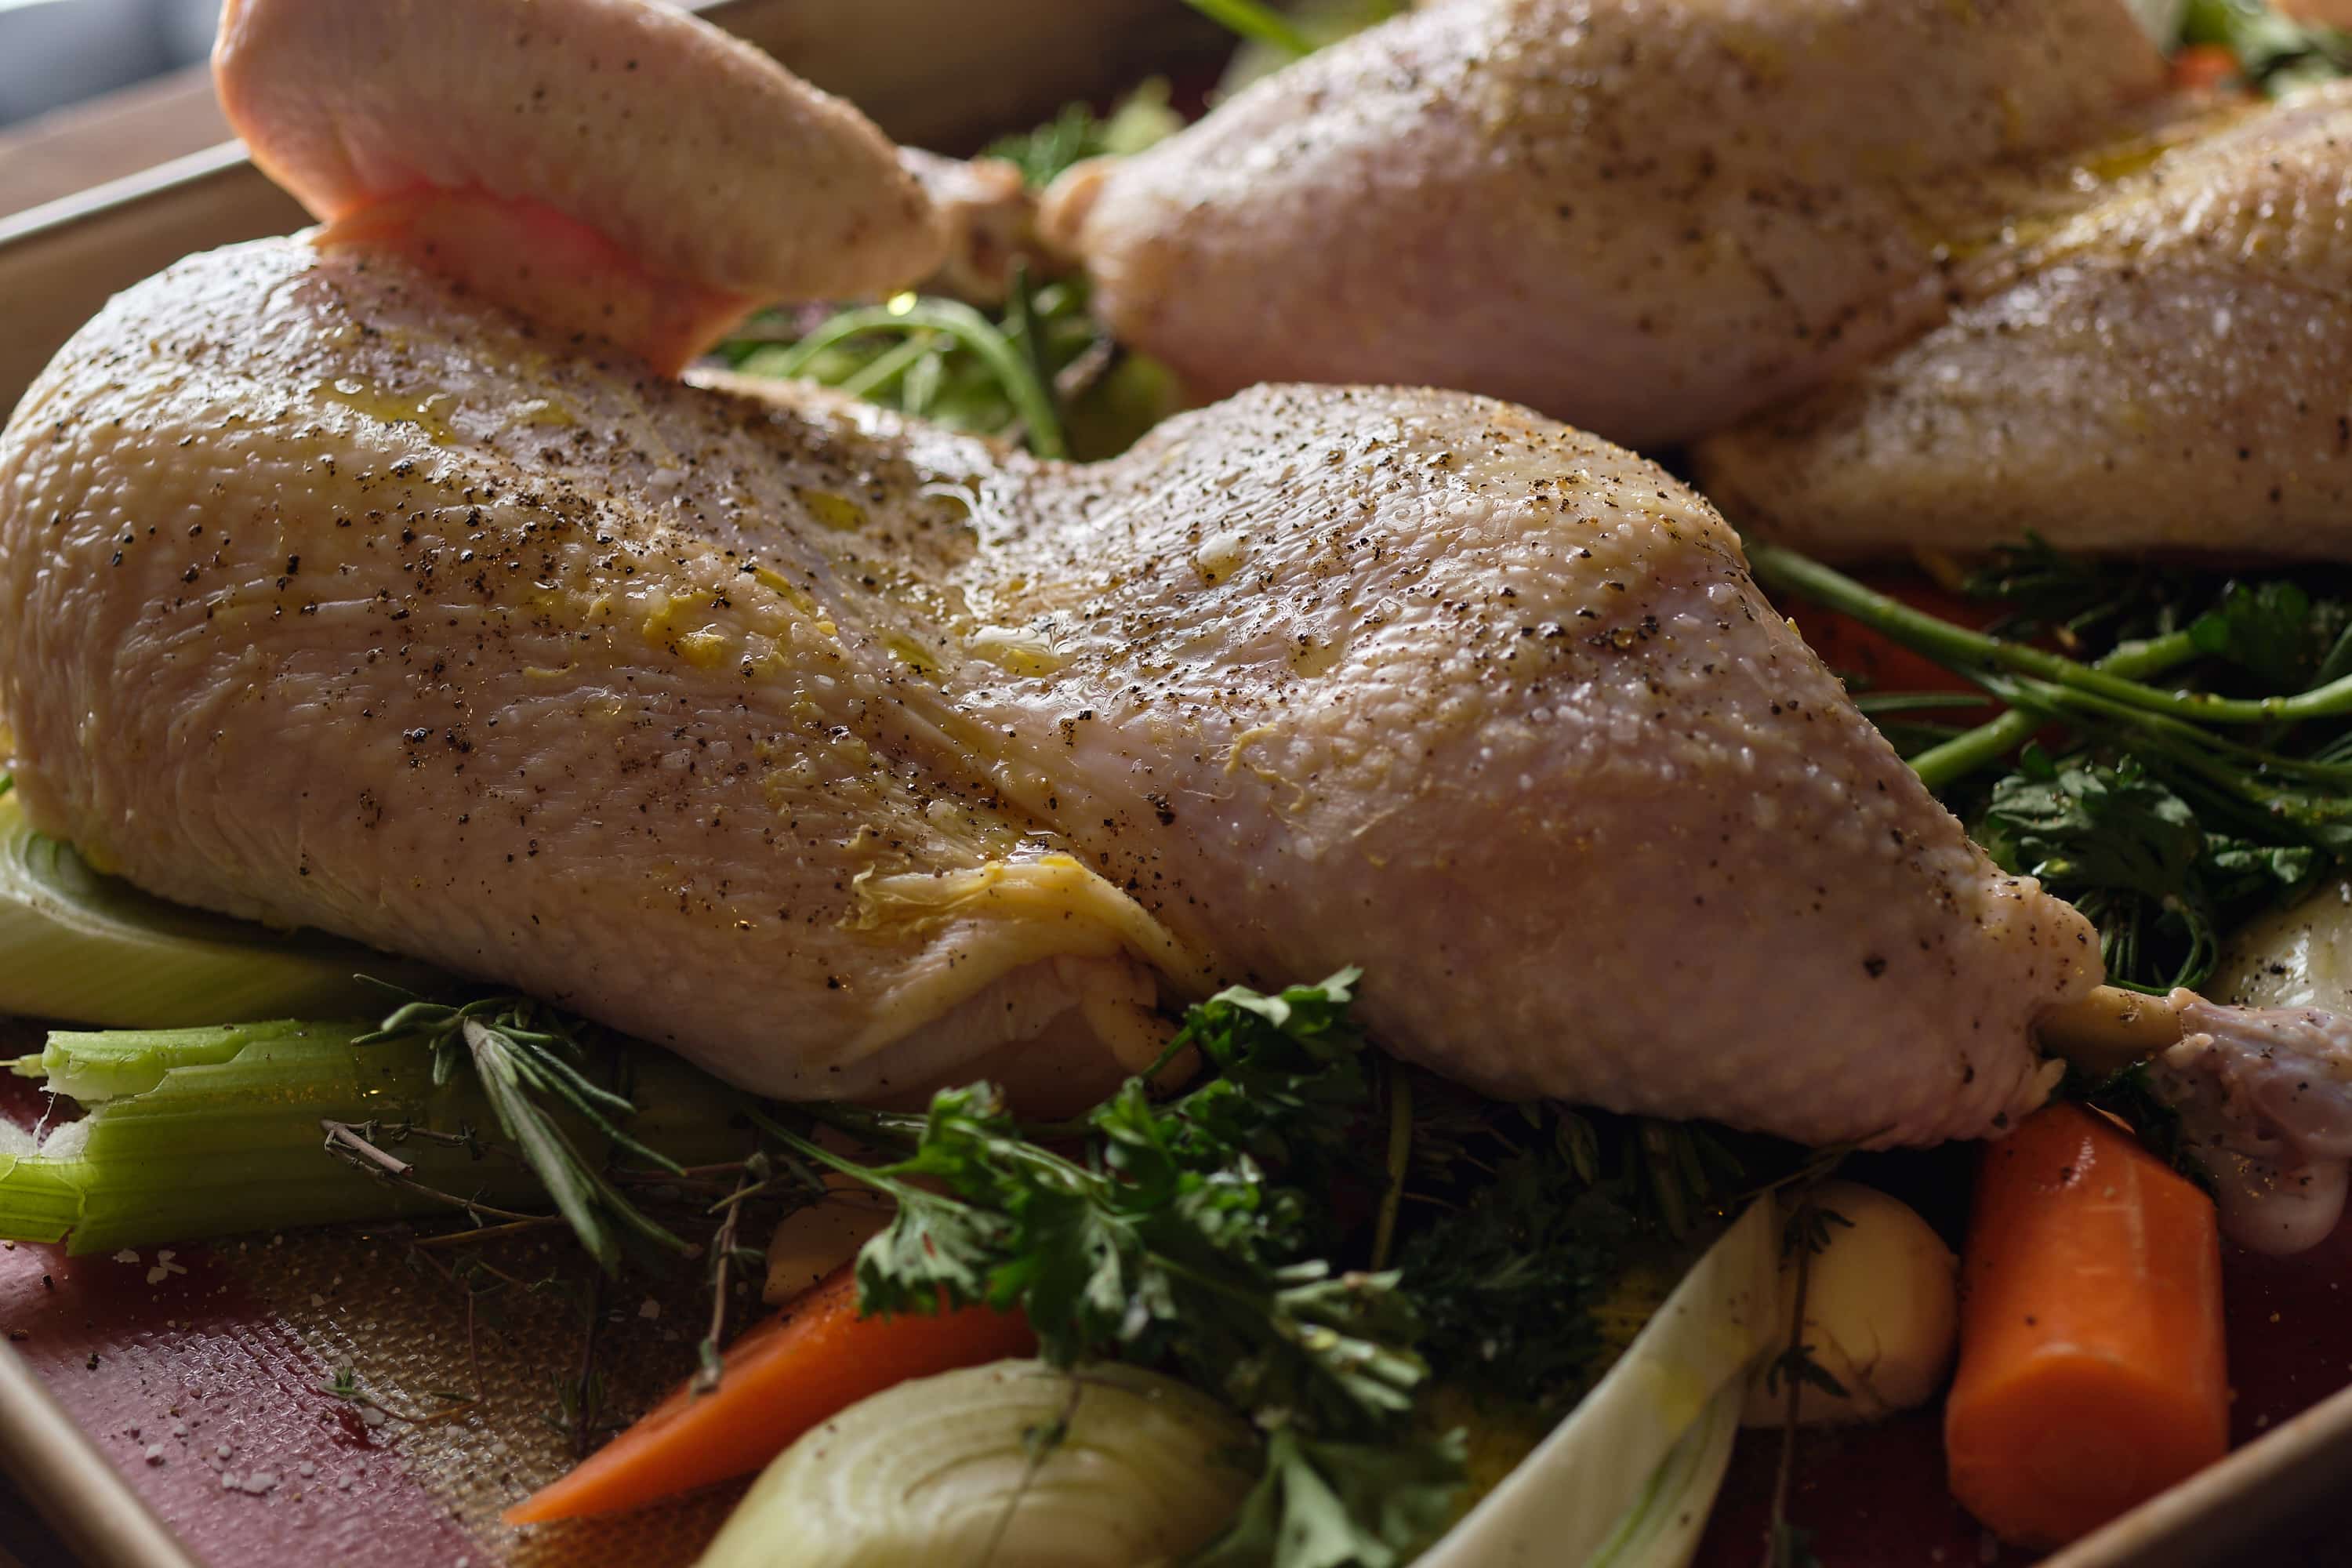
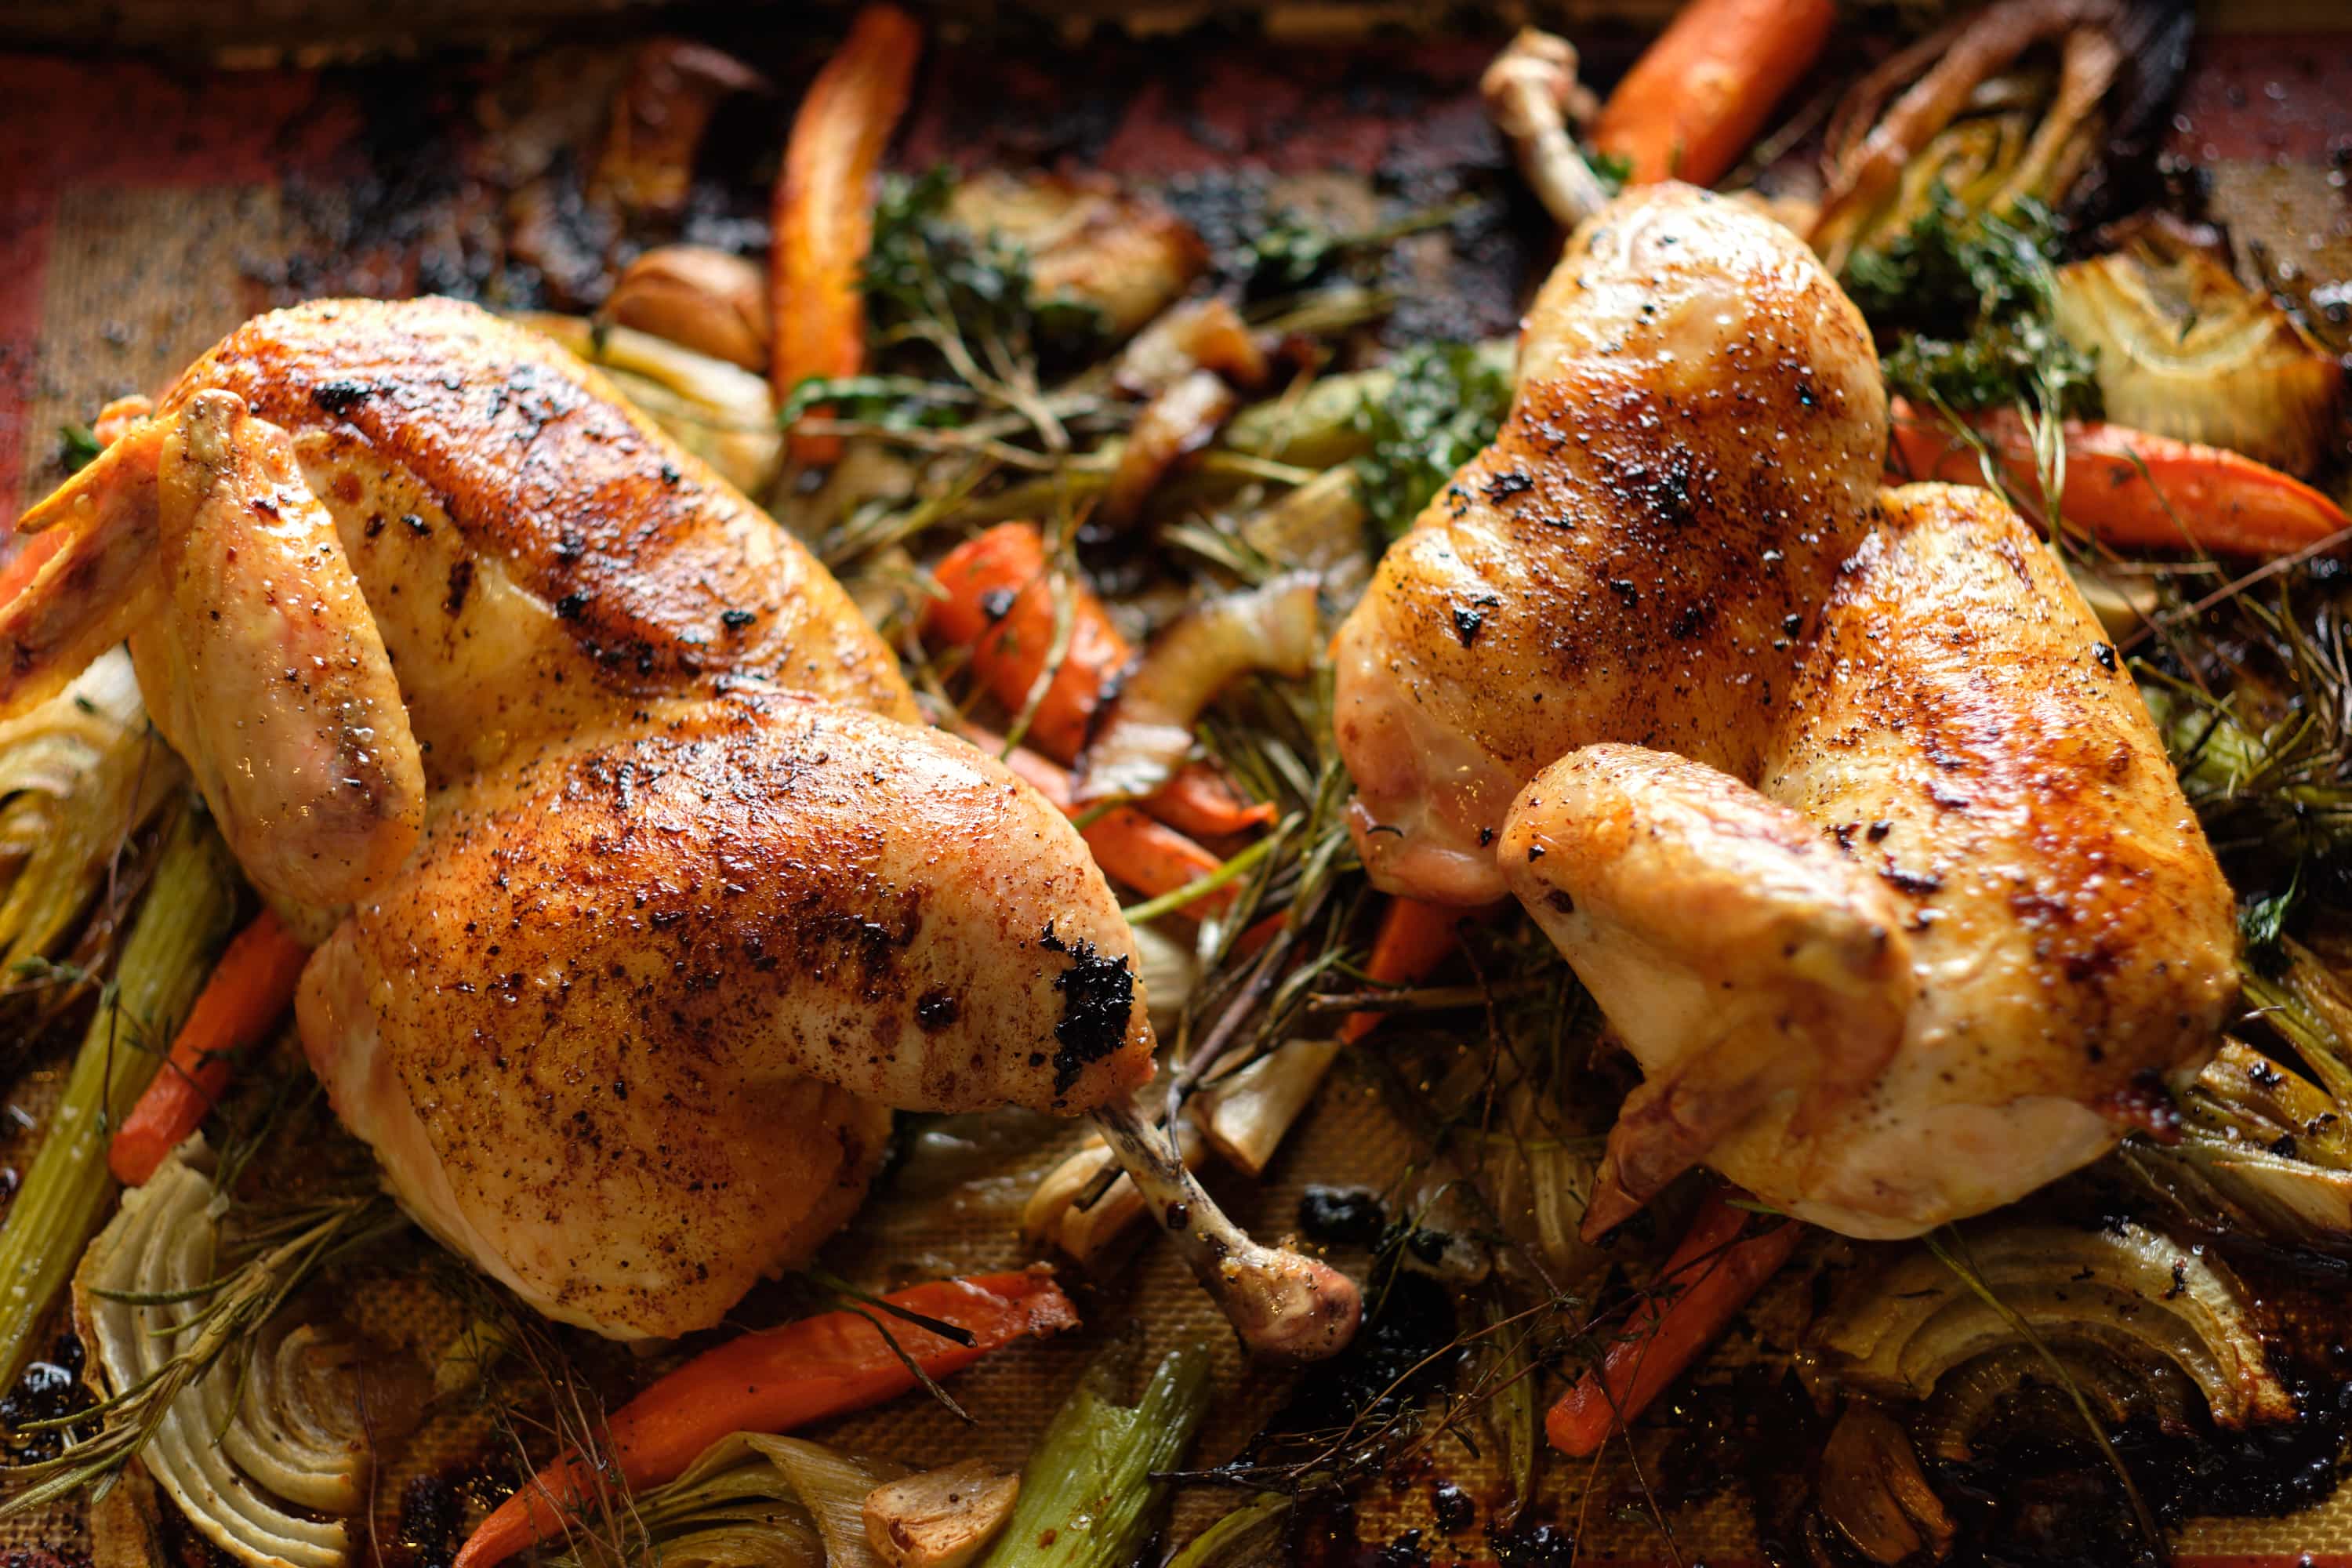
Preheat the oven to 550°F. Line a cooking tray with parchment or Silpat and cover with onions, celery, carrots, and lemon. Place the chicken on top, lightly drizzle with some olive oil and a generous coating of salt and pepper. Lower the temp to 425 and cook for 25 minutes. Remove the chicken to add a few tablespoons of butter and some lemon juice. Baste every 5-10 minutes until the chicken reaches an internal temp of 150-155°F then baste one final time. Allow to rest for 15 minutes before carving.

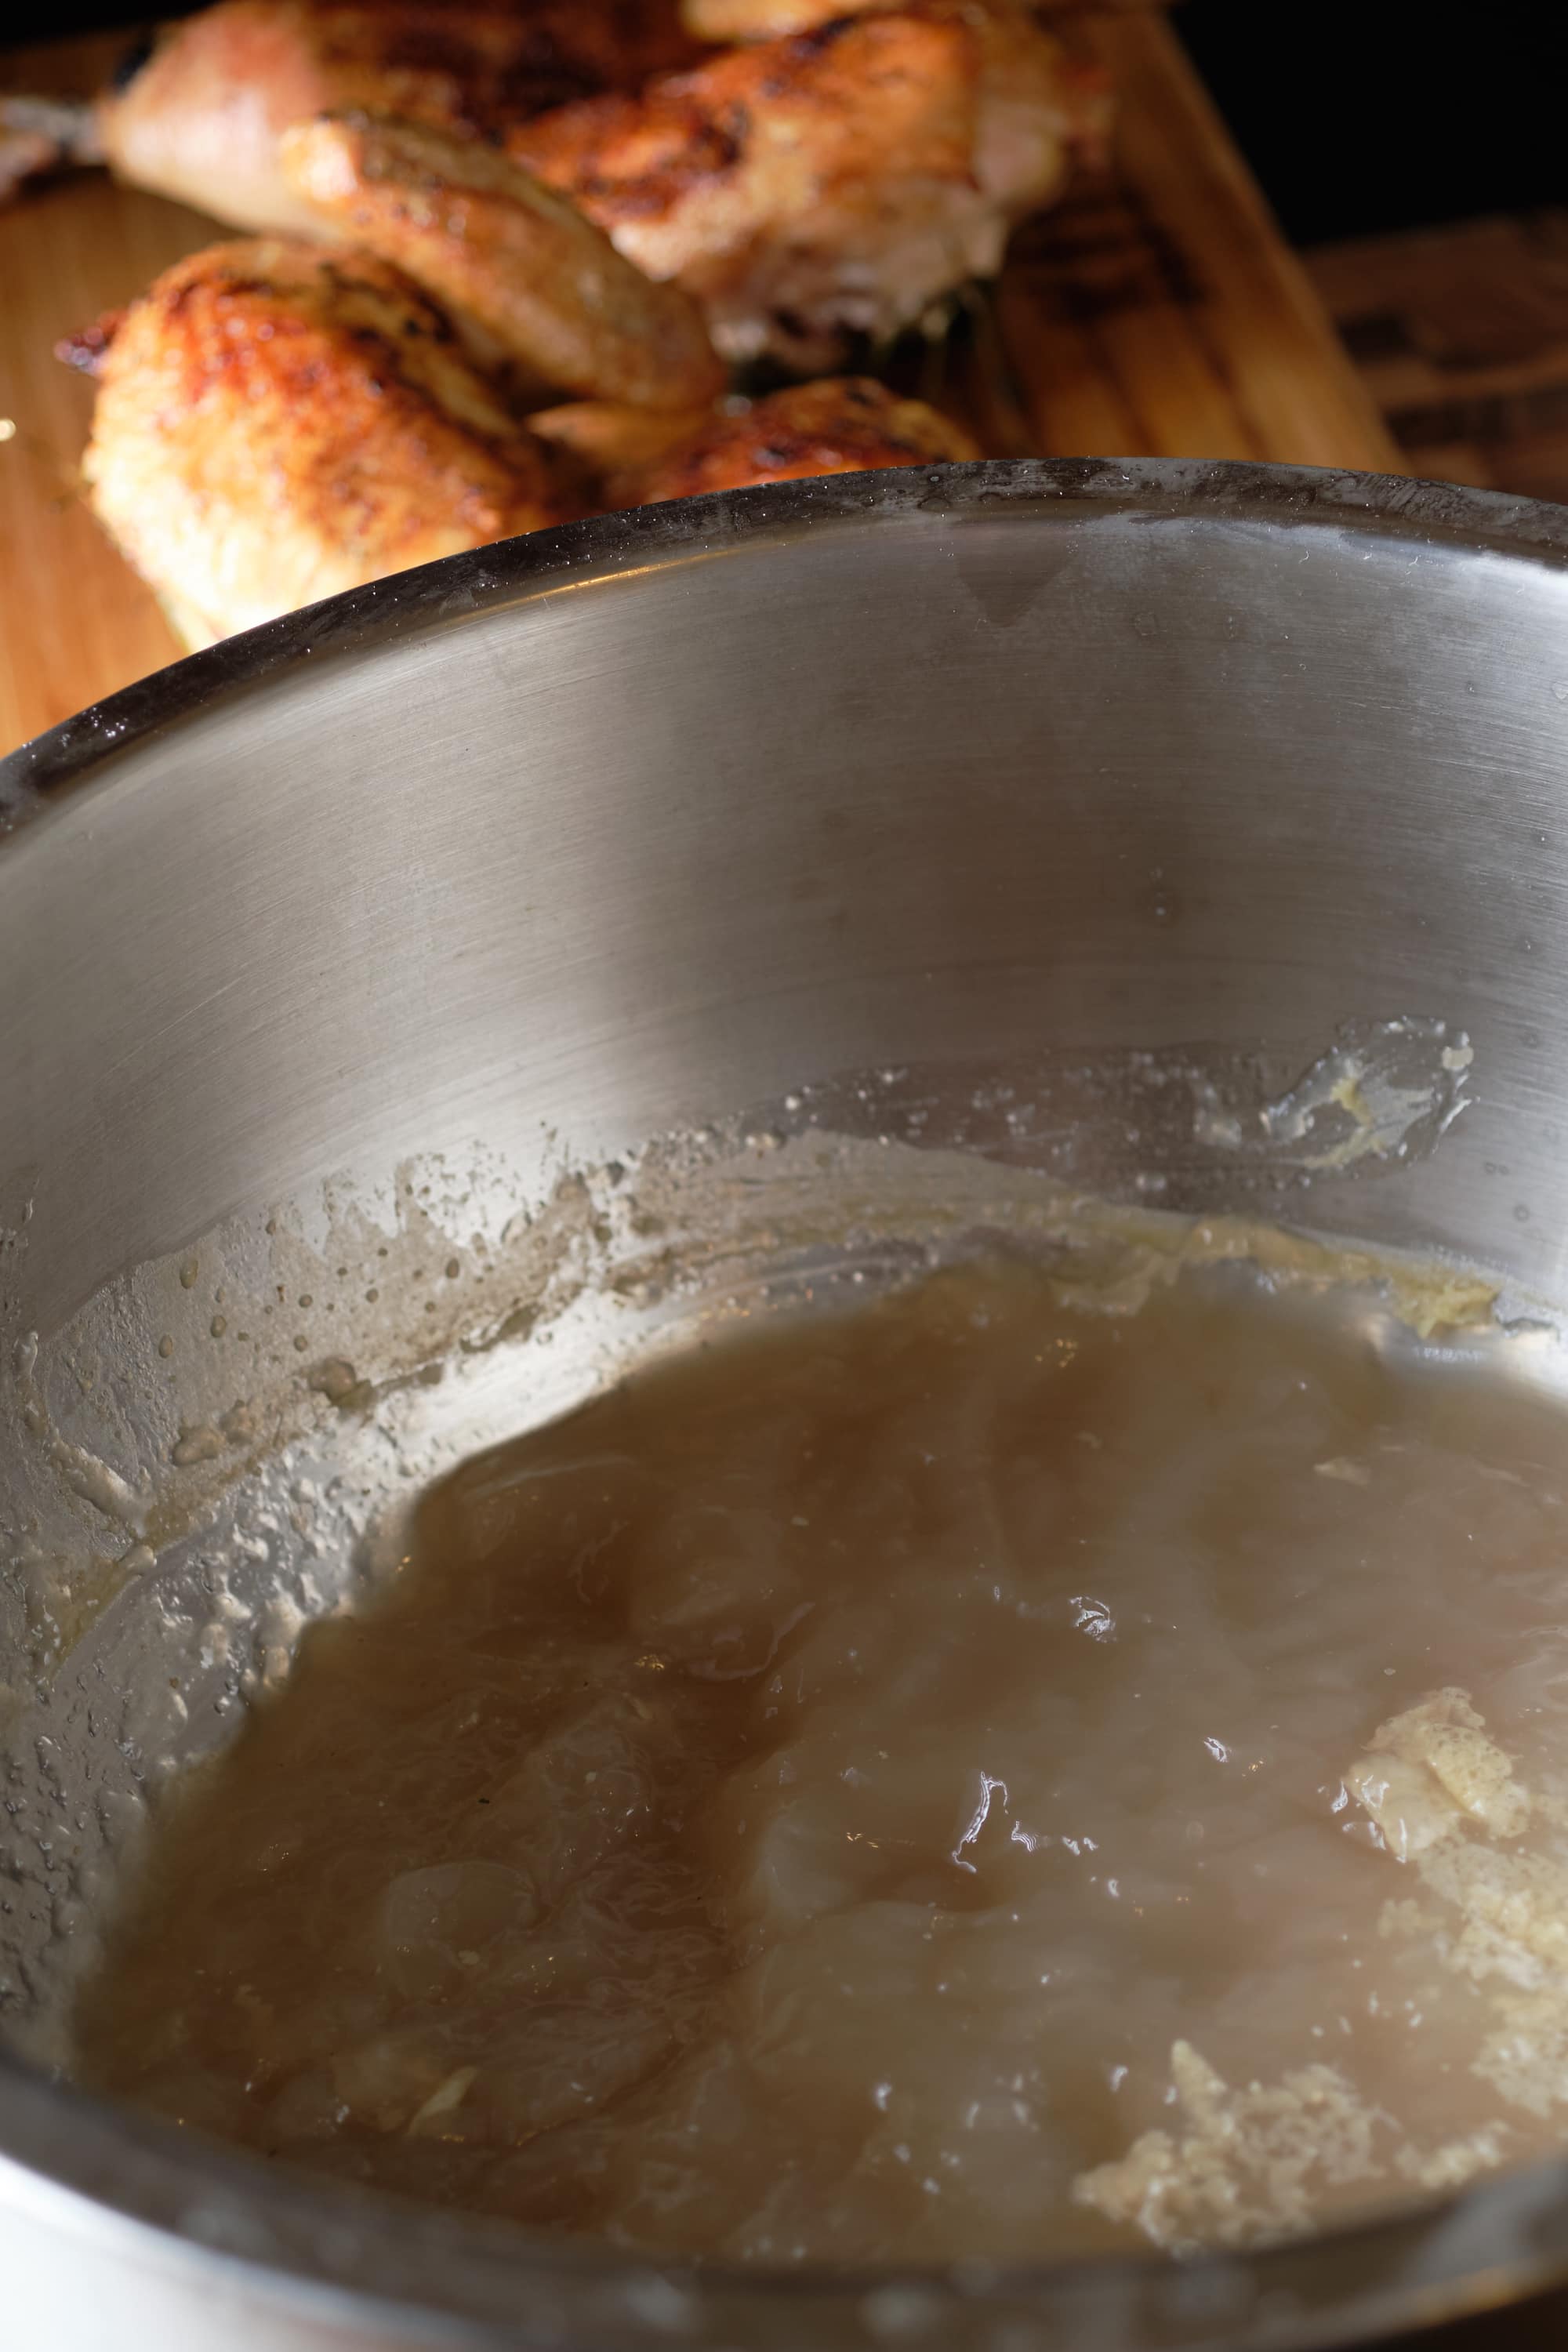
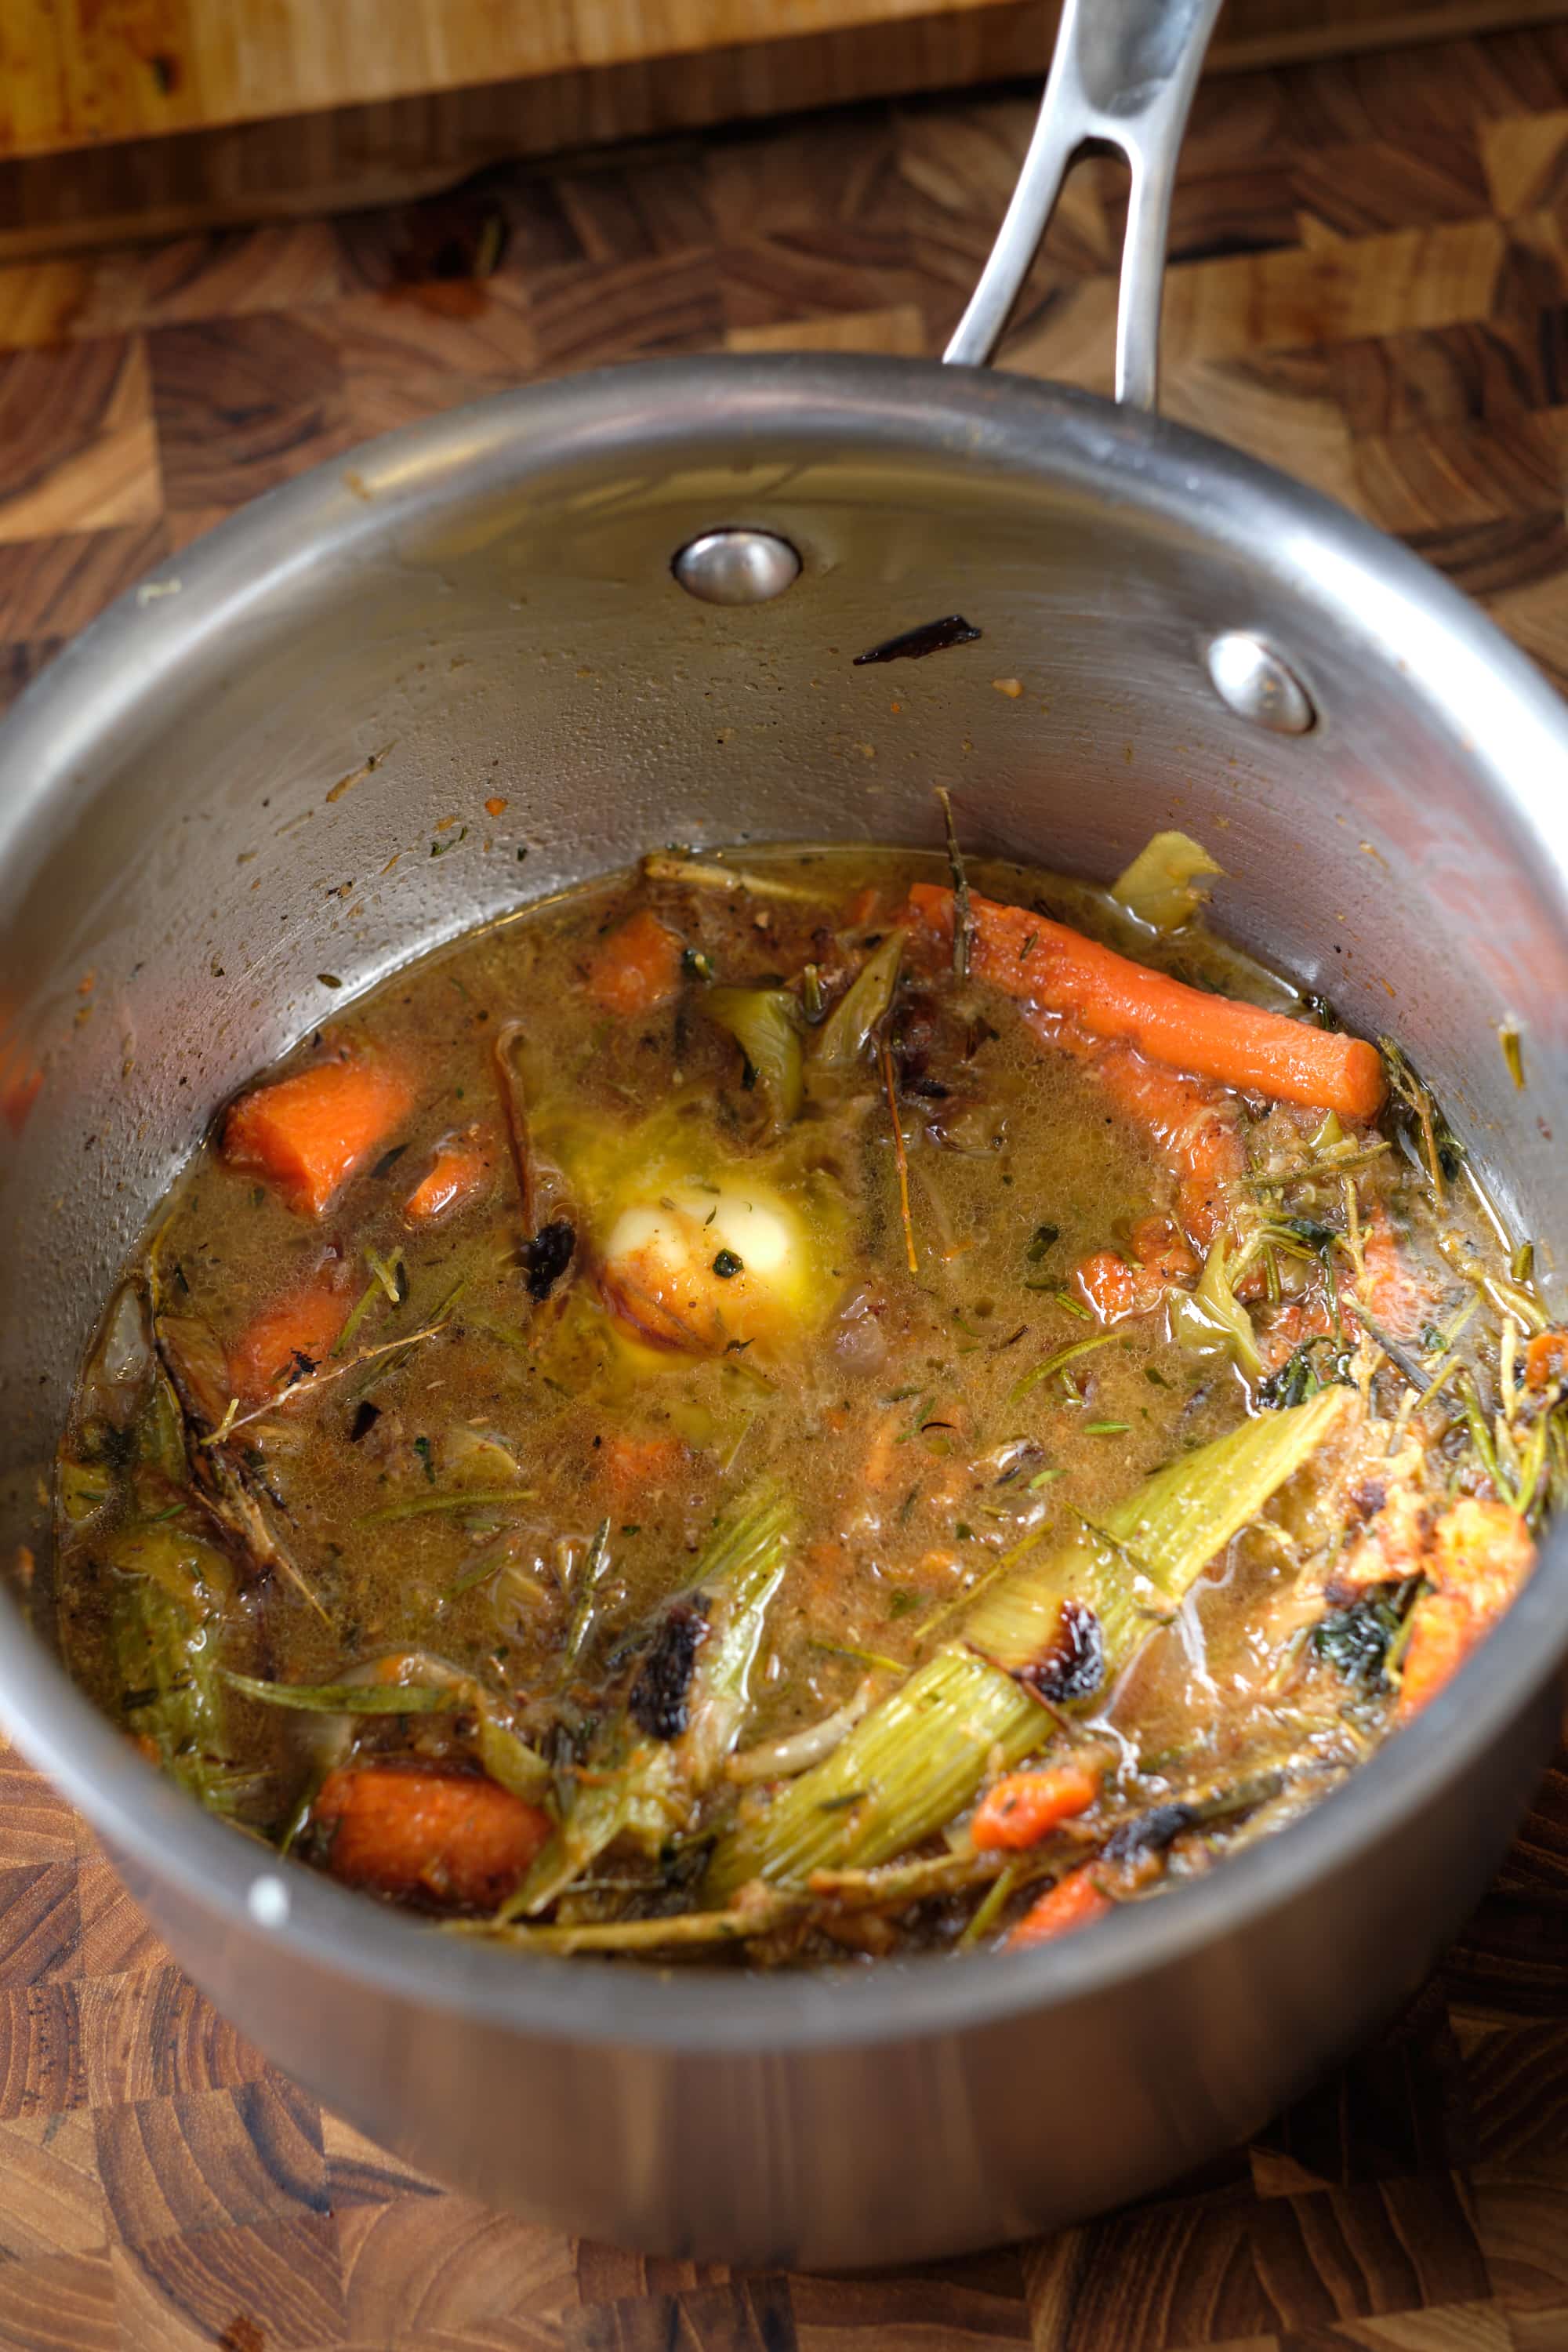
We now have a whole roasting pan full of juices from the chicken, vegetables, olive oil, butter, lemon, salt, and pepper. Transfer all of this to a saucepan with a cup or two of chicken stock. Bring to a simmer over medium-low heat for about 5 minutes. Strain out and discard the solids then transfer the liquid back to the saucepan along with some fresh thyme and some lemon juice or white wine. Whisk in a bit of cornstarch slurry to reach your desired consistency.
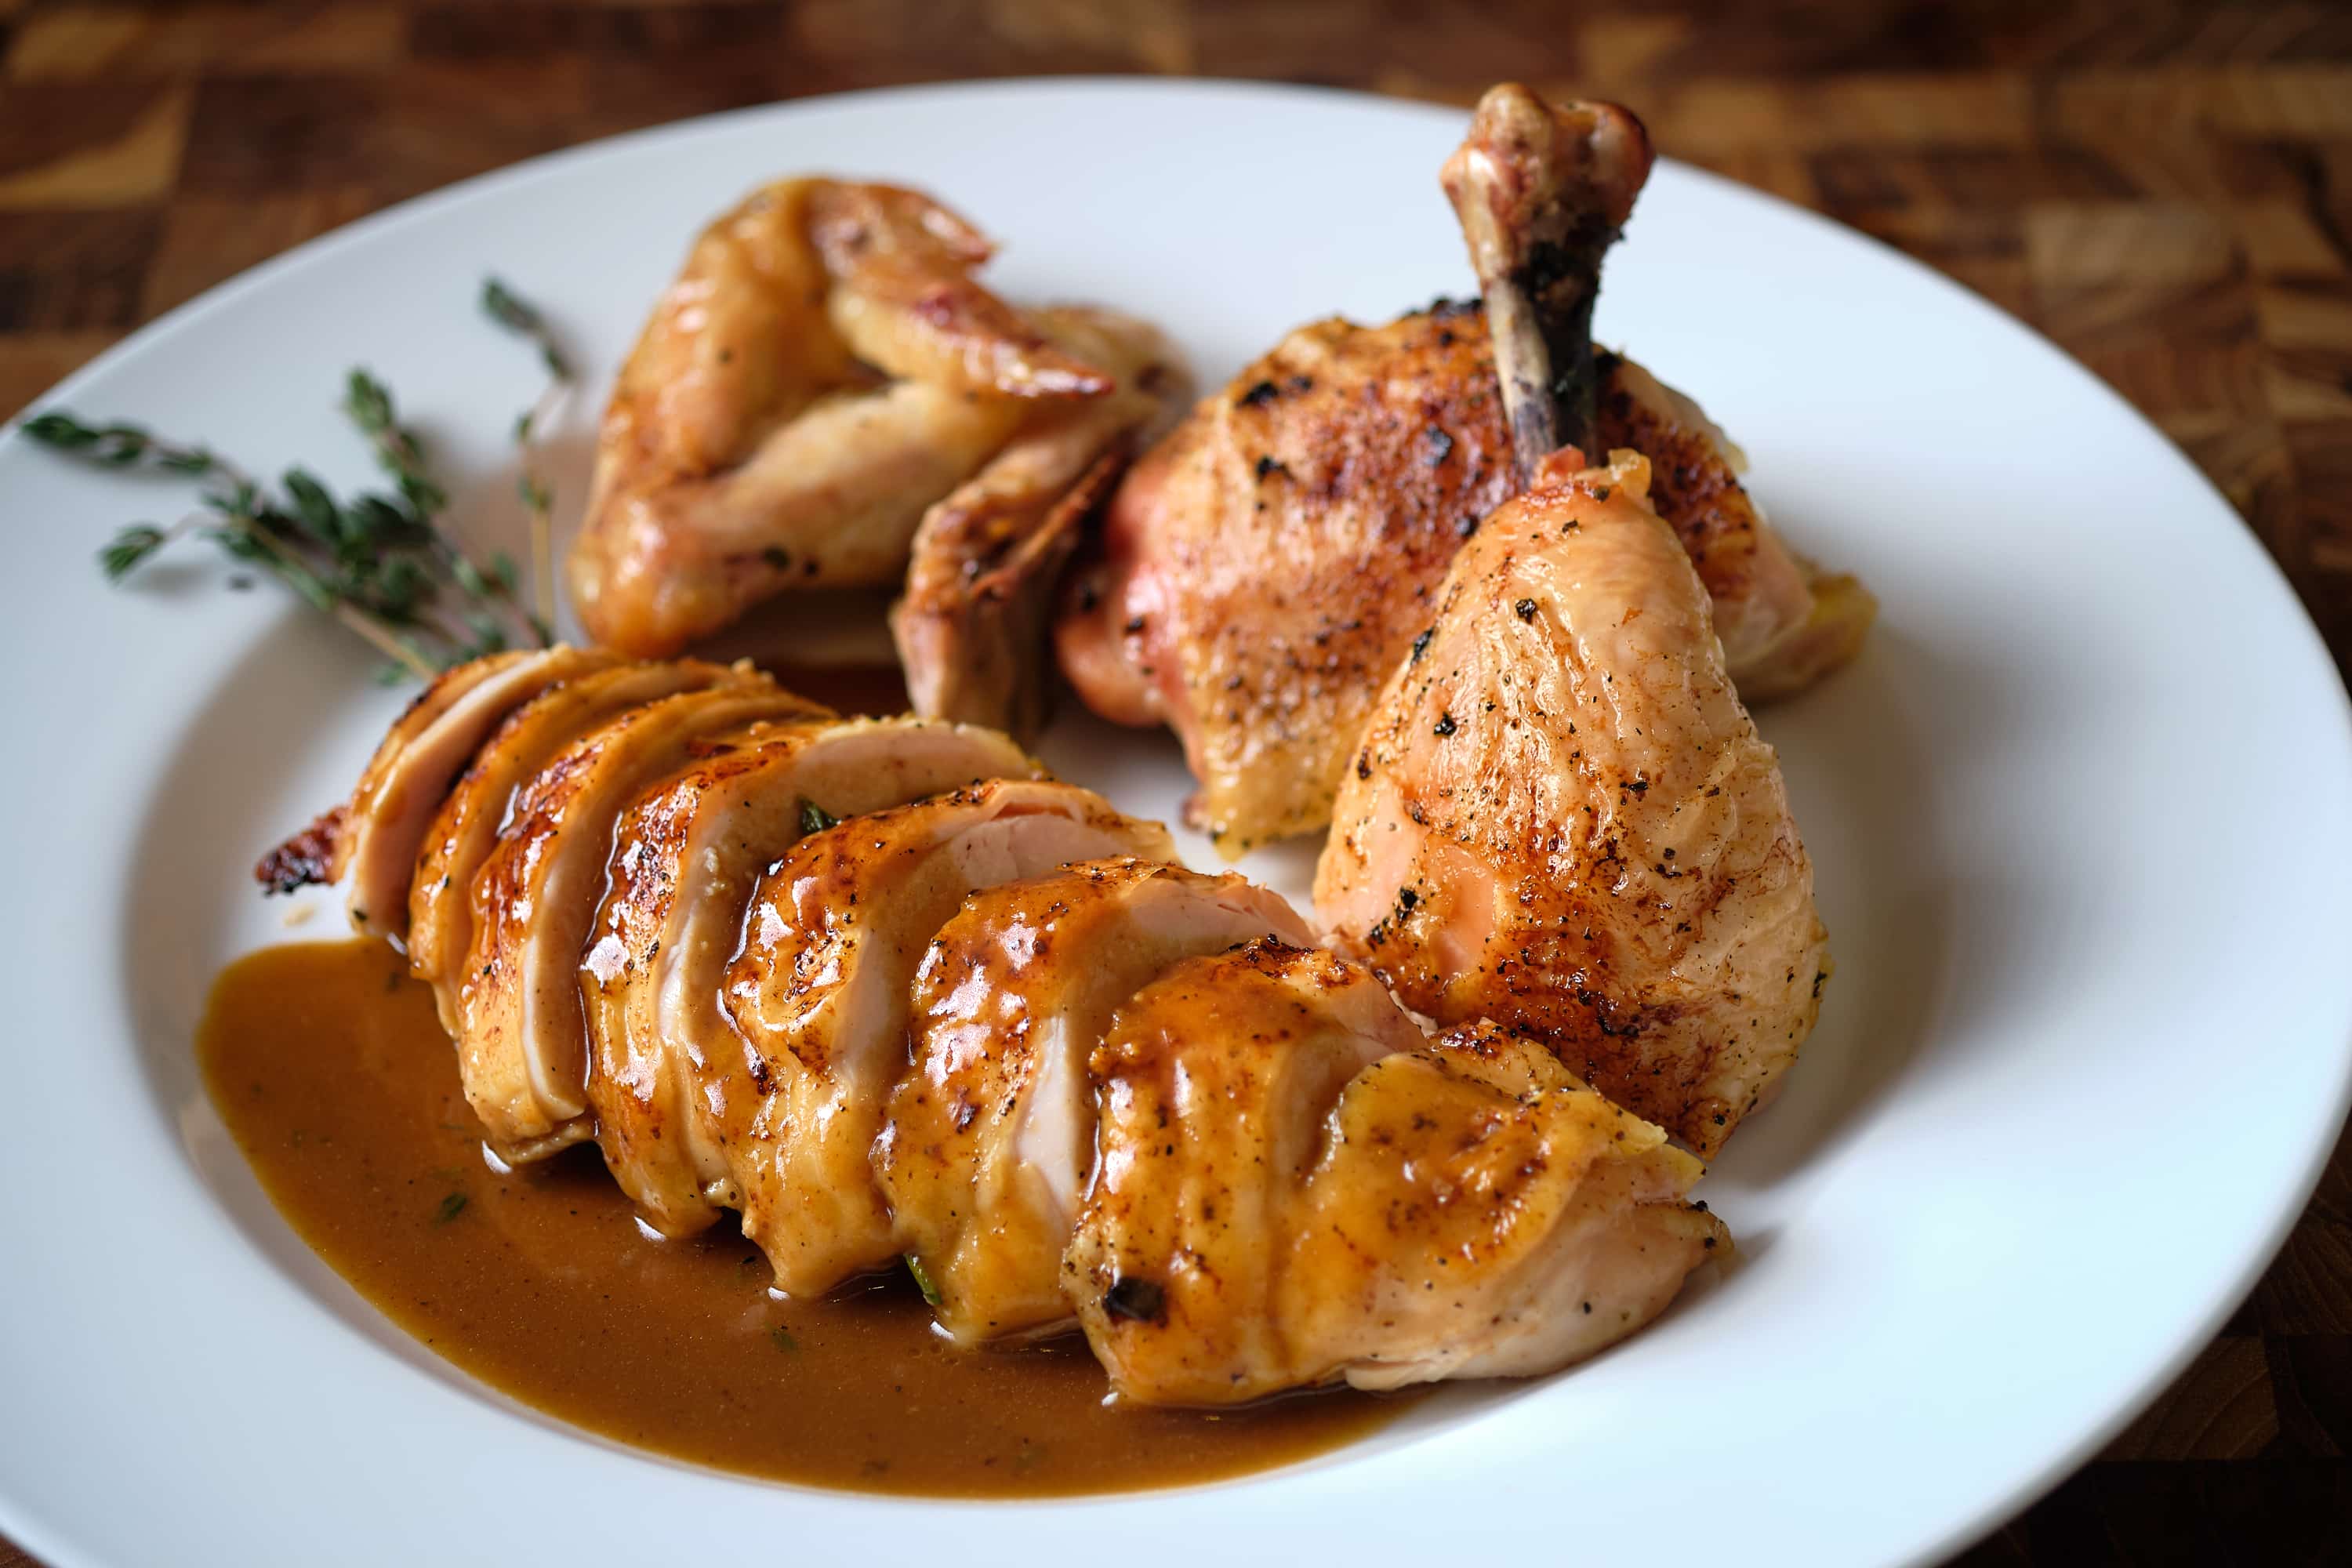
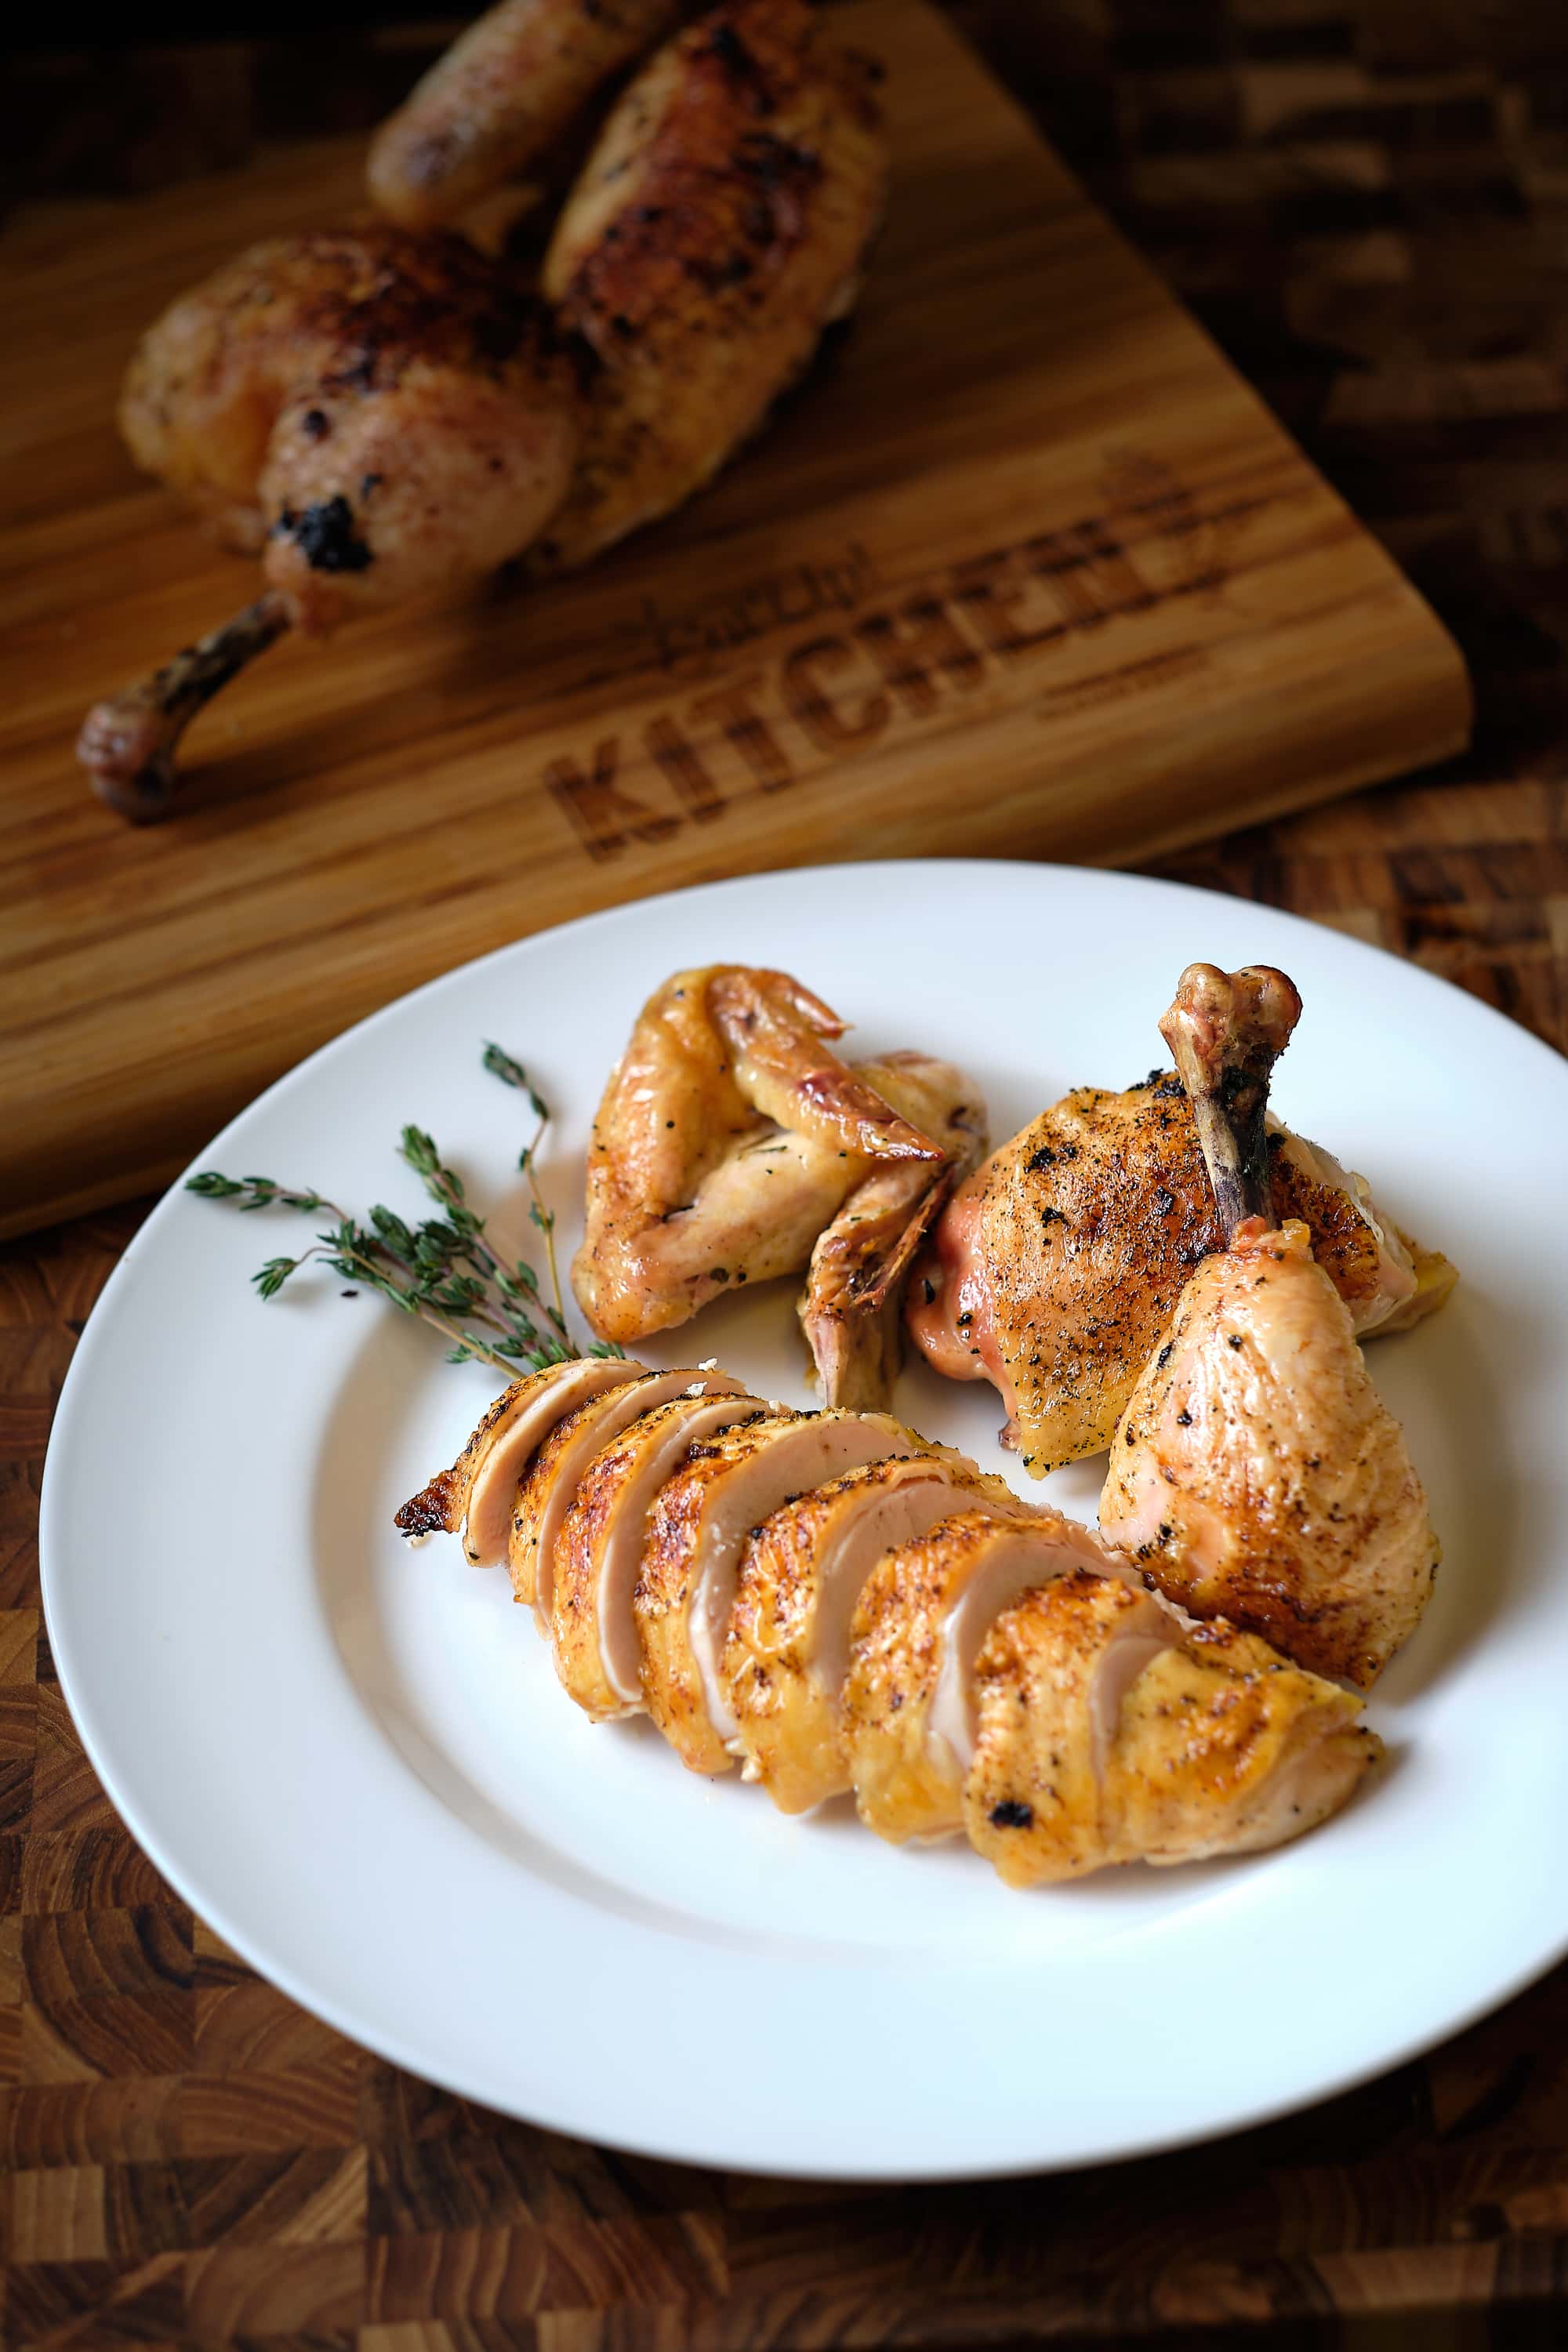
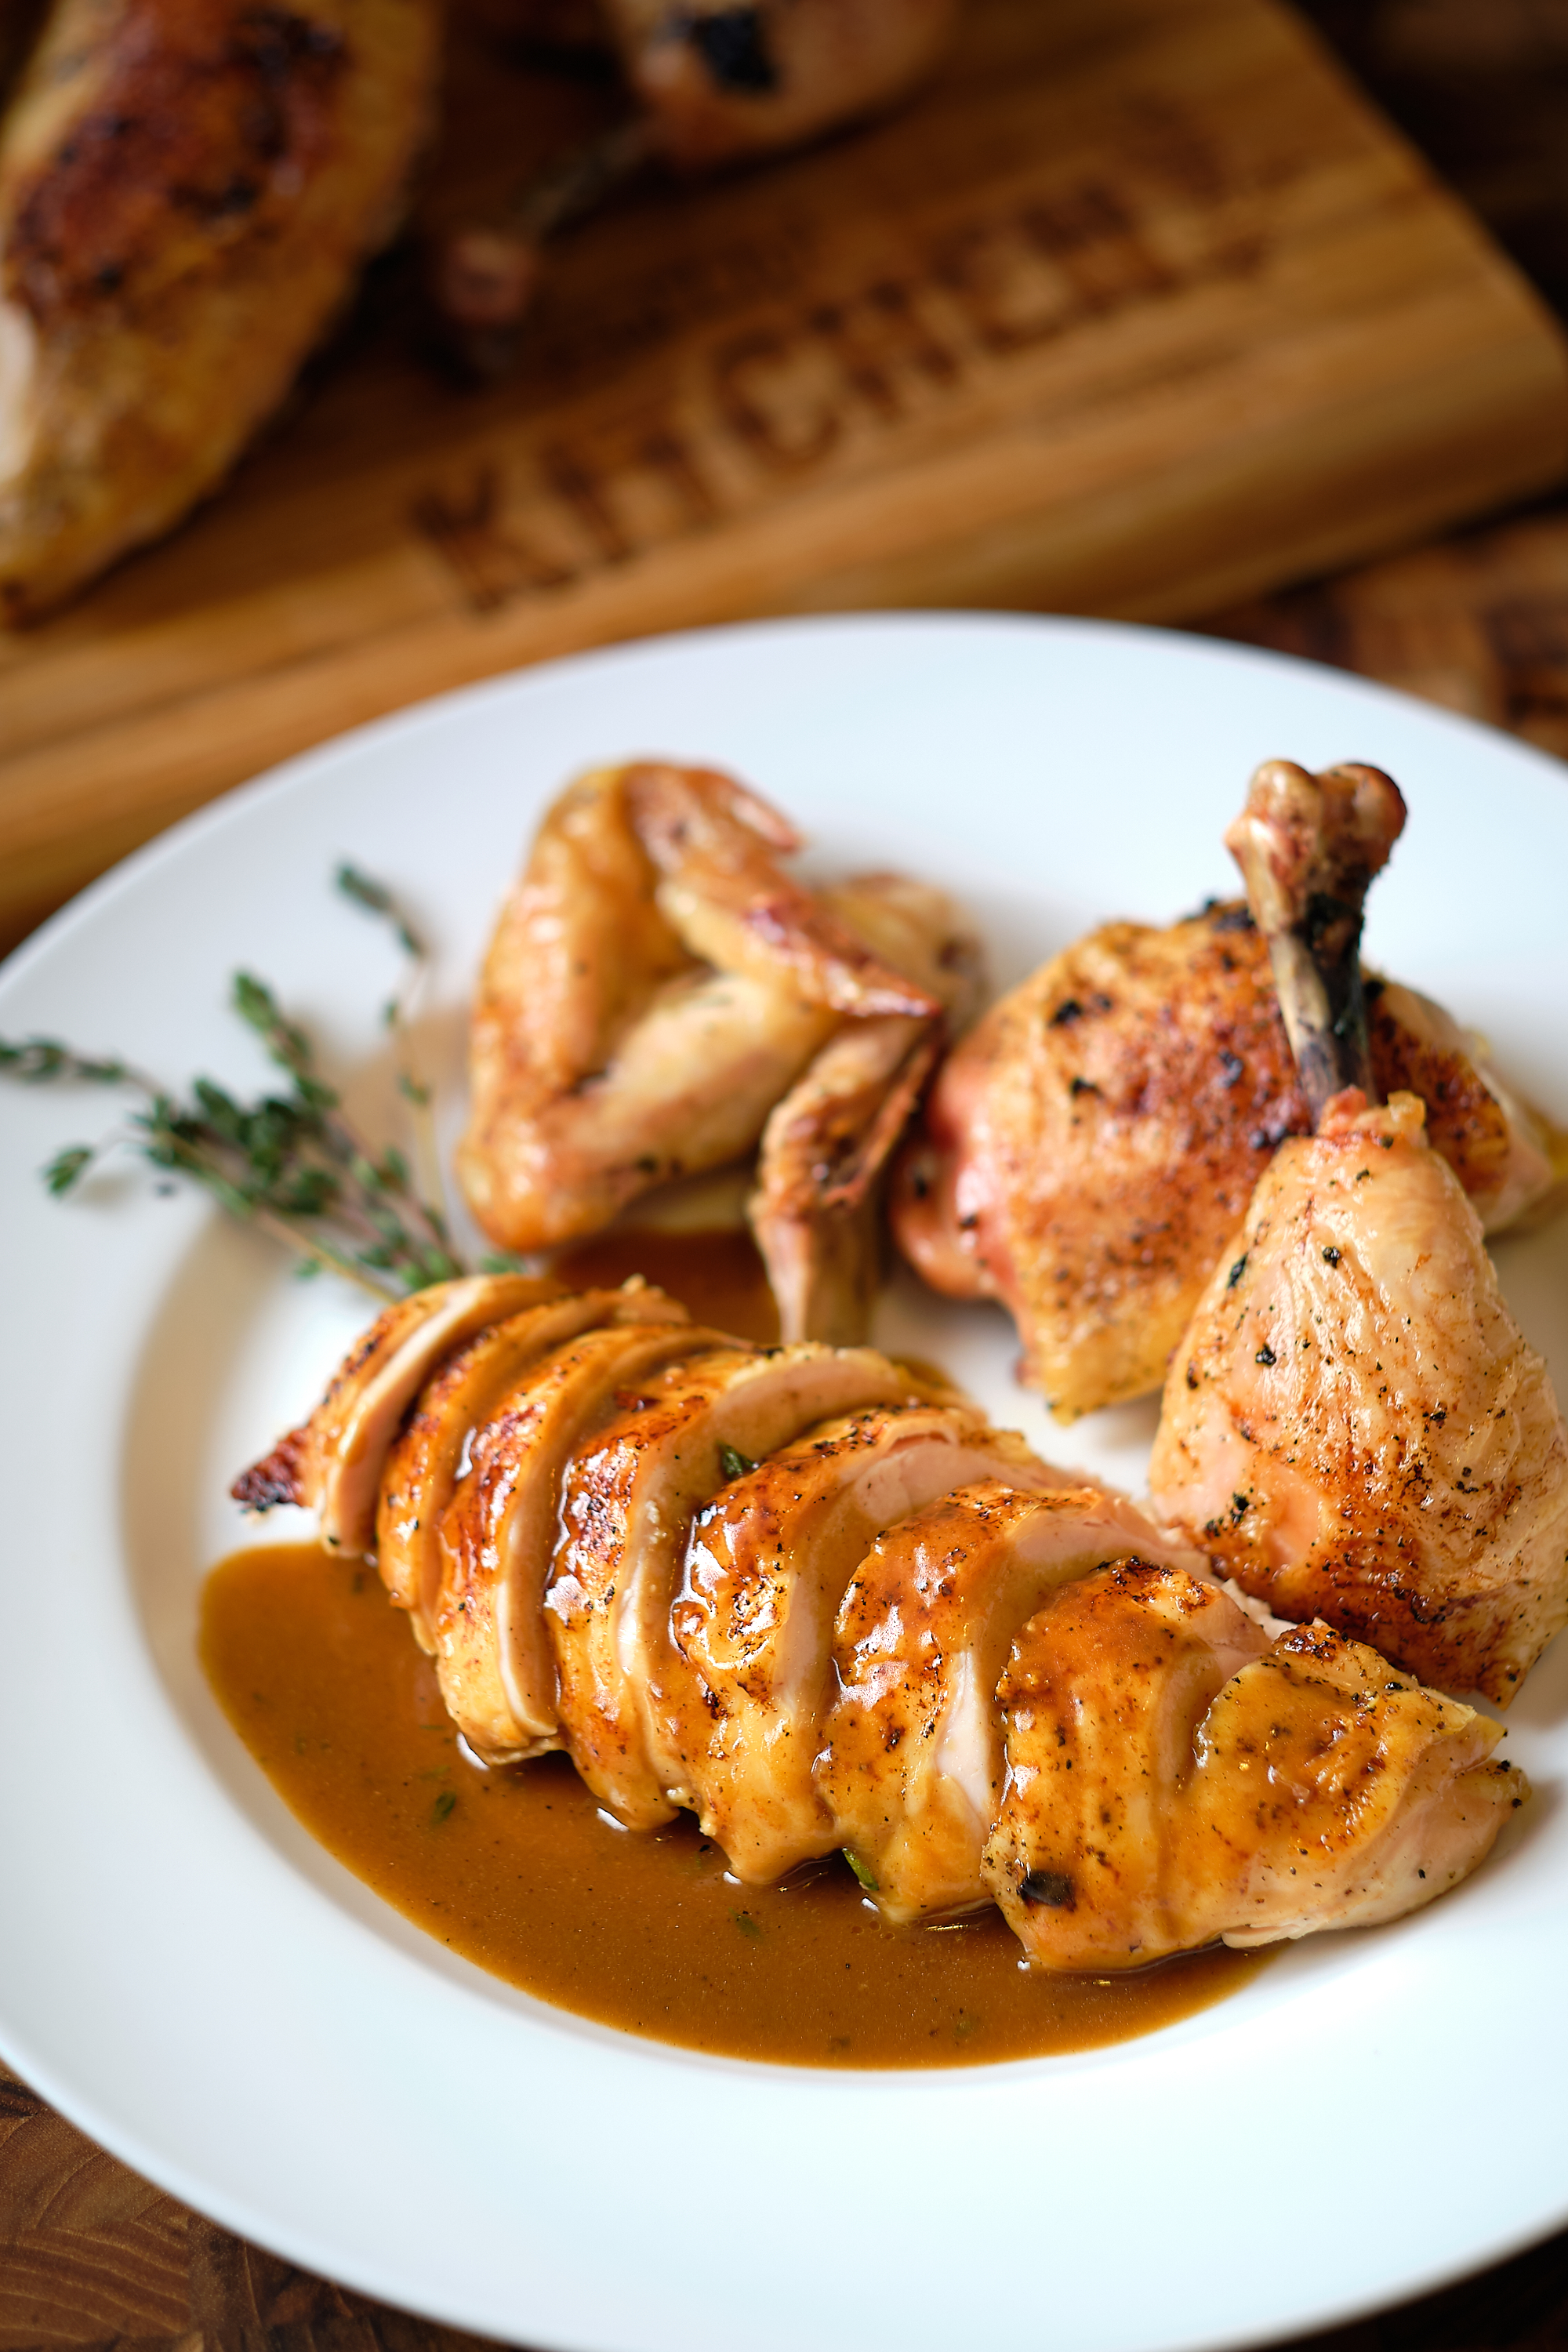
Carve the chicken and plate with lots of gravy and a little side salad or some sauteed veggies. Maybe get yourself some buttered Italian bread to sop up all that delicious gravy, mmm! It’s loaded with deep lush flavors cut with the bright citrusy lemon juice and fresh thyme. It doesn’t really get better than this! I don’t care how good your upright lemon stuffed, butter herbed chicken skin looks – this taste better and it cooks in half the time.
Split Roast Chicken
2
servings15
minutes45
minutes15
minutes1
hour15
minutesThe Eat Up! Kitchen Split Roast Chicken just might be your next favorite roast chicken! Split roasting means more surface area and faster cooking. Basting keeps the meat juicy and develops deep golden coloring on the skin. The pan juice and roasted vegetables all come together with some fresh lemon juice and thyme to slap you in the pucker with more flavor than you’d expect from a ‘roast chicken’.
Keep the screen of your device on
Ingredients
- Roast Chicken
1 whole chicken
1 onion
2 stalks celery
2 carrots
2 lemons
5-6 sprigs fresh thyme
1 tbsp olive oil
salt
pepper
4 tbsp unsalted butter
- Gravy
1-2 cups chicken stock
1 tsp cornstarch
1 tbsp water
Directions
- Preheat oven to 550°F. Line a baking sheet with Silpat or parchment paper.
- Set chicken out on the counter wrapped in paper towels for 20-30 minutes. This will bring it to room temp for faster, more even cooking and remove surface moisture for drier skin.
- Clean and prep vegetables. Slice onions, carrots, celery, lemons about 1/4 thick and spread on top of lined baking sheet. This will prop the chicken up from the hot surface of the pan as well as develop a rich flavor from the caramelized vegetables.
- Make sure chicken is thoroughly dried then split in half. Remove backbone with scissors and split breast in half from the inside out with a large chefs knife. Lay on top of vegetables, dab again with paper towels, lightly coat with olive oil then and coat generously with salt and pepper.
- Transfer chicken to the middle of the oven, lower temp to 425°F, and roast 25 minutes. Remove from oven, check internal temp, place 3-4 tablespoons butter on top of chicken and the juice of half a lemon. Depending on temp, baste and check temp every 5-10 minutes until internal temp is 150-155°F and skin is dark golden brown. Transfer chicken to a clean plate or carving board to rest for 15 minutes.
- For the Gravy: Scrape out the juices and vegetables from the cooking tray to a medium saucepan. Add 1-2 cups of chicken stock and heat over medium-low flame. Simmer for 5 minutes then strain into a clean bowl. Discard the vegetables. Transfer the strained gravy back to the saucepan along with a couple fresh sprigs of thyme. Taste for salt and pepper. In a small bowl, mix cornstarch and water. Over medium-low heat, slowly whisk cornstarch slurry into the gravy to reach your desired consistency.
- Carve chicken and serve with Lemon Thyme Gravy.
Notes
- Cooking time is based on my rather large 7 1/2 pound chicken. Be sure to check internal temp after 30 minutes of roasting.
Did you make this recipe?
Tag @eatupkitchen on Instagram and hashtag it
Like this recipe?
Follow us @eatupkitchen on Pinterest


Brush on thai chili sauce a half hour before it’s done for delicious crispt skin.
Best roasted chicken recipe ever! We used a Mary’s free range chicken from Natural Grocers here in Colorado. So delicious. Thanks!
So happy to get your feedback Linda! Thanks for sharing.